2022-03-27

PreferenceKey Quirks

PreferenceKey has a few quirks that have tripped me up. One is the reduce(value:nextValue:) implementation. The other is that a PreferenceKey will not propagate upward past a View that has a preference(key:value:) set using the same PreferenceKey.

reduce(value:nextValue:)

I've found that PreferenceKey's reduce(value:nextValue) will be called several times, even if there are no other Views that have a preference() with the same PreferenceKey in the View tree. And sometimes nextValue() in those calls will return a nil value. Because of this, nextValue() should do more than just
static func reduce(value: inout CGSize, nextValue: () -> CGSize) {
value = nextValue()
}
view raw BadReduce.swift hosted with ❤ by GitHub

One option is to reduce based on a timestamp:
struct ColorPreference: Equatable {
static func == (lhs: ColorPreference, rhs: ColorPreference) -> Bool {
lhs.date == rhs.date
}
let color: Color
let date = Date()
}
struct ColorPreferenceKey: PreferenceKey {
static var defaultValue: ColorPreference? = nil
static func reduce(value: inout ColorPreference?, nextValue: () -> ColorPreference?) {
let nextValue = nextValue()
if let notNilValue = value,
let nextValue = nextValue {
if nextValue.date > notNilValue.date {
value = nextValue
}
} else if value == nil && nextValue != nil {
value = nextValue
}
// Do nothing for these conditions
// value == nil && nextValue == nil
// value != nil && nextValue == nil
}
}

PreferenceKey Propagation Blocked by preference(key:value:)

Another issue I've found is a PreferenceKey will not get passed up through the View tree past any parent View that uses the same PreferenceKey in a preference(key:value:)
//: A Cocoa based Playground to present user interface
import AppKit
import SwiftUI
import PlaygroundSupport
struct ColorPreference: Equatable {
static func == (lhs: ColorPreference, rhs: ColorPreference) -> Bool {
lhs.date == rhs.date
}
let color: Color
let date = Date()
}
struct ColorPreferenceKey: PreferenceKey {
static var defaultValue: ColorPreference? = nil
static func reduce(value: inout ColorPreference?, nextValue: () -> ColorPreference?) {
let nextValue = nextValue()
if let notNilValue = value,
let nextValue = nextValue {
if nextValue.date > notNilValue.date {
value = nextValue
}
} else if value == nil && nextValue != nil {
value = nextValue
}
// Do nothing for these conditions
// value == nil && nextValue == nil
// value != nil && nextValue == nil
}
}
struct TestView: View {
var body: some View {
ZStack {
color
WrapperView()
}
.onPreferenceChange(ColorPreferenceKey.self) { colorPreference in
color = colorPreference?.color
}
}
@State private var color: Color? = .white
}
struct WrapperView: View {
var body: some View {
VStack {
ButtonsView()
Button("Blue") {
colorPreference = ColorPreference(color: .blue)
}
Button("Yellow") {
colorPreference = ColorPreference(color: .yellow)
}
}
.onPreferenceChange(ColorPreferenceKey.self) { colorPreference in
let color: String
if let colorPreferenceColor = colorPreference?.color {
color = "\(colorPreferenceColor)"
} else {
color = "nil"
}
print("\(color) before preference")
}
.preference(key: ColorPreferenceKey.self, value: colorPreference)
.onPreferenceChange(ColorPreferenceKey.self) { colorPreference in
let color: String
if let colorPreferenceColor = colorPreference?.color {
color = "\(colorPreferenceColor)"
} else {
color = "nil"
}
print("\(color) after preference")
}
}
@State private var colorPreference: ColorPreference? = nil
}
struct ButtonsView: View {
var body: some View {
VStack {
Button("Red") {
colorPreference = ColorPreference(color: .red)
}
Button("Green") {
colorPreference = ColorPreference(color: .green)
}
}
.preference(key: ColorPreferenceKey.self, value: colorPreference)
}
@State private var colorPreference: ColorPreference? = nil
}
// Present the view in Playground
PlaygroundPage.current.liveView = NSHostingView(rootView: TestView())

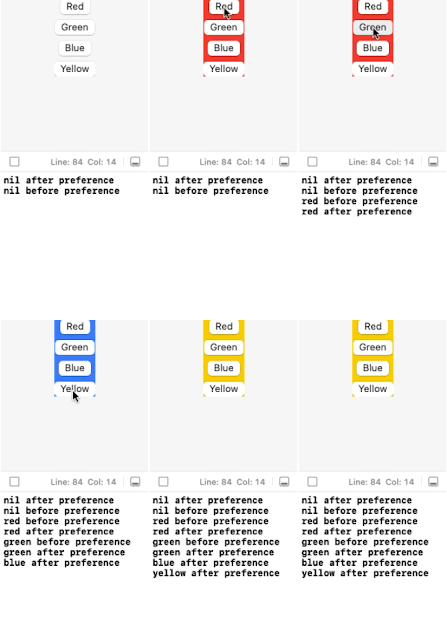
The "Red" and "Green" buttons should generate "before" and "after" messages while the "Blue" and "Yellow" buttons should only create "after" messages and all buttons should change the color. But because of the issue the "Red" and "Green" buttons don't work as expected.

A way around this is to capture the preference before using it again:
struct ColorModifier: ViewModifier {
func body(content: Content) -> some View {
content
.onPreferenceChange(ColorPreferenceKey.self) { colorPreference in
self.colorPreference = colorPreference
}
.preference(key: ColorPreferenceKey.self, value: colorPreference)
}
@Binding var colorPreference: ColorPreference?
}
extension View {
func colorPreference(value: Binding<ColorPreference?>) -> some View {
self.modifier(ColorModifier(colorPreference: value))
}
}
struct WrapperView: View {
var body: some View {
VStack {
ButtonsView()
Button("Blue") {
colorPreference = ColorPreference(color: .blue)
}
Button("Yellow") {
colorPreference = ColorPreference(color: .yellow)
}
}
.onPreferenceChange(ColorPreferenceKey.self) { colorPreference in
let color: String
if let colorPreferenceColor = colorPreference?.color {
color = "\(colorPreferenceColor)"
} else {
color = "nil"
}
print("\(color) before preference")
}
.colorPreference(value: $colorPreference)
.onPreferenceChange(ColorPreferenceKey.self) { colorPreference in
let color: String
if let colorPreferenceColor = colorPreference?.color {
color = "\(colorPreferenceColor)"
} else {
color = "nil"
}
print("\(color) after preference")
}
}
@State private var colorPreference: ColorPreference? = nil
}

Now the "Red" and "Green" buttons work as expected.

2021-12-13

Spotlight on macOS using a lot of CPU

If you are a developer on macOS and notice Spotlight consuming a lot of CPU the reason could be that Spotlight is indexing the Simulator and Platforms directories. When I ran lsof and checked the files that spotlight was accessing, it was reading files in ~/Library/Developer/CoreSimulator and /Applications/Xcode.app/Contents/Developer/Platforms. Adding those two directories to the Spotlight Privacy tab and then restarting your computer will prevent Spotlight from indexing them. Go to System Preferences > Spotlight > Privacy to add them.

2019-01-15

Restart Xcode Playground

If your playground ever crashes and/or gets stuck try switching the playground type in the File Inspector (right panel) to a different Platform and then back. This should restart the playground simulator.

2018-09-20

Simple Events in Swift

Events are useful when you need more than one delegate or event handler. Here is a simple class that can be used to manage events:

public class Event<T> {
// Return false if the event handler should be removed, ie: if the class instance used in the event handler is no longer valid
// { [weak self] val in
// guard let strongSelf = self else {
// return false
// }
// strongSelf.doStuff(with: val)
// return true
// }
public typealias EventHandler = ((T) -> Bool)
public init() {}
public func notify(_ event: T) {
for (uuid, eventHandler) in uiEventHandlers {
DispatchQueue.main.async { [weak self] in
if eventHandler(event) == false {
self?.uiEventHandlers[uuid] = nil
}
}
}
for (uuid, eventHandler) in eventHandlers {
if eventHandler(event) == false {
eventHandlers[uuid] = nil
}
}
}
public func subscribe(uuid: UUID, eventHandler: @escaping EventHandler) {
eventHandlers[uuid] = eventHandler
}
public func uiSubscribe(uuid: UUID, eventHandler: @escaping EventHandler) {
uiEventHandlers[uuid] = eventHandler
}
public func uiUnsubscribe(uuid: UUID) {
uiEventHandlers[uuid] = nil
}
public func unsubscribe(uuid: UUID) {
eventHandlers[uuid] = nil
}
private var eventHandlers: [UUID: EventHandler] = [:]
private var uiEventHandlers: [UUID: EventHandler] = [:]
}
view raw Event.swift hosted with ❤ by GitHub


Use the uiSubscribe and uiUnsubscribe to have the Event class automatically run the event handler on the main DispatchQueue (for GUI related stuff). Here is an example of how to use them:

class EventProducer {
var value: Int = 0 {
didSet {
valueEvent.notify(value)
}
}
let valueEvent = Event<Int>()
}
class EventConsumer {
init(producer: EventProducer) {
producersValue = producer.value
producer.valueEvent.subscribe(uuid: uuid) { [weak self] value in
guard let strongSelf = self else {
return false
}
print("Value changed: \(value)")
strongSelf.producersValue = value
return true
}
}
private var producersValue: Int
private let uuid = UUID()
}
let producer = EventProducer()
let consumer = EventConsumer(producer: producer)
producer.value = 5

2018-09-18

UIColor Extension for RGBA Hex and HSLA

Here is an extension for UIColor that I've found useful when working with Photoshop and Web designers. It allows you to specify a UIColor in RGBA hex or HSLA.

extension UIColor {
// Hex init
// UIColor(r: 0xFF, g: 0xFF, b: 0xFF)
convenience init(r: UInt8, g: UInt8, b: UInt8, a: UInt8=0xFF) {
assert(r >= 0 && r <= 255, "Invalid red component")
assert(g >= 0 && g <= 255, "Invalid green component")
assert(b >= 0 && b <= 255, "Invalid blue component")
assert(a >= 0 && a <= 255, "Invalid alpha component")
self.init(red: CGFloat(r) / 255.0, green: CGFloat(g) / 255.0, blue: CGFloat(b) / 255.0, alpha: CGFloat(a) / 255.0)
}
// HSL init
// UIColor(h: 270.0, s: 1.0, l: 1.0)
convenience init(h: CGFloat, s: CGFloat, l: CGFloat, a: CGFloat=1.0) {
assert(h >= 0.0 && h <= 360.0, "Invalid hue component")
assert(s >= 0.0 && s <= 1.0, "Invalid saturation component")
assert(l >= 0.0 && l <= 1.0, "Invalid lightness component")
assert(a >= 0.0 && a <= 1.0, "Invalid alpha component")
let c = (1 - abs(2 * l - 1)) * s
let hPrime = h / 60
let x = c * (1 - abs(hPrime.truncatingRemainder(dividingBy: 2) - 1))
var r1, g1, b1: CGFloat
if 0.0 <= hPrime && hPrime <= 1.0 {
r1 = c; g1 = x; b1 = 0
} else if 1.0 <= hPrime && hPrime <= 2.0 {
r1 = x; g1 = c; b1 = 0
} else if 2.0 <= hPrime && hPrime <= 3.0 {
r1 = 0; g1 = c; b1 = x
} else if 3.0 <= hPrime && hPrime <= 4.0 {
r1 = 0; g1 = x; b1 = c
} else if 4.0 <= hPrime && hPrime <= 5.0 {
r1 = x; g1 = 0; b1 = c
} else {
r1 = c; g1 = 0; b1 = x
}
let m = l - 0.5 * c
self.init(red: r1 + m, green: g1 + m, blue: b1 + m, alpha: a)
}
}
view raw UIColor.swift hosted with ❤ by GitHub

2014-03-26

Label Sphere will be removed

I will be removing the Label Sphere from the Blogger Gadgets list on April 5th. This may break the Label Sphere on your blog. If you want to keep using the Label Sphere then read on.

If you have manually added the latest gadget using the url http://alexdioso.github.com/LabelSphere/LabelSphere.xml then you don't have to do anything.

If you have not manually added (or don't know) then you probably added the Label Sphere using the Gadgets list. To keep using the Label Sphere:

  1. Remove the current Label Sphere on your blog.
  2. Click on "Add a Gadget".
  3. In the "Add a Gadget" window that opens:
    1. In the left column, click "Add your own".
    2. Enter the url:  http://alexdioso.github.com/LabelSphere/LabelSphere.xml
    3. Click "Add by URL".

2012-04-21

Displaying user@host in tmux window titles

I use tmux a lot (having switched from GNU Screen) and frequently ssh to different hosts from different tmux windows. One thing that I find helpful is knowing which host I'm ssh'd to in each tmux window. Here is a little trick for your .bash_aliases (on every host you ssh to) which will display user@host in each tmux window title:
case "$TERM" in
screen)
export PROMPT_COMMAND='echo -ne "\033]2;${USER}@${HOSTNAME}: ${PWD}\007\033k${USER}@${HOSTNAME}\033\\"'
;;
esac
view raw gistfile1.sh hosted with ❤ by GitHub

The first part sets the terminal's window title to user@host: /working/directory
\033]2;${USER}@${HOSTNAME}: ${PWD}\007
The second part set's the current tmux window title to user@host
\033k${USER}@${HOSTNAME}\033\\

PreferenceKey Quirks

PreferenceKey has a few quirks that have tripped me up. One is the reduce(value:nextValue:) implementation. The other is that a PreferenceKe...